If the response I got on the photo I posted to Facebook of the Rainbow Cake is any indicator, people seem to be fascinated by this dessert. Its psychedelic array of hues is undeniably eye-catching, but I cannot take credit for its creation, despite seeing it splashed across the food blogosphere. Nope, it was entirely Katherine's idea, and she performed the vast majority of the work on it, while I sat nearby and sipped a beverage. I helped a bit with adding the food coloring, and loading the pans into the oven, but that's about it. Since I was the one who documented the process, however, I'll be the one passing it along to you.
 Of course this is just an ordinary, unassuming cake, why wouldn't it be...
We started off with a boxed, white cake mix, although you could ostensibly make your own cake batter from scratch if you were so inclined, as long as it is a white cake, so as to not interfere with the food coloring. Prepare the mix according to package instructions.
 I don't even want to think very hard about all the food coloring in this cake. Natural food enthusiasts the world over are probably dying a little bit on the inside.
Once the batter is done, you have a few options. You can either try to include all six colors in each layer, or divide your colors and put three colors in each layer. We opted for the latter technique, so that each color would be clearly defined. In the pictures we saw on the Internet, cakes that tried to get all six colors in each layer had too little of each color per layer for our liking.
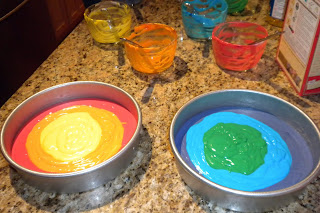
You'll need to divide the batter into six containers (we used glass bowls so that they wouldn't stain.) However, you will need the most batter for the bottom layer, and the least batter for the top layer. Although I lost track of how much batter we used, I think it was close to 1 cup for the bottom color, 3/4 cup for the middle color, and 1/2 cup for the top color. What matters the most is that you are consistent with the measurements between the two layers of the cake; that is to say, you should have the same amount of batter for the top, middle, and bottom colors of each layer.
We used a combination of paste food coloring and liquid food coloring. The paste food coloring worked pretty well for every color except the red, which took a large amount of the paste and the liquid food coloring to achieve the desired vibrancy.
Once you've mixed all your colors, pour the different batters one on top of the other, starting with your bottom color, so that it looks like a bullseye. You'll be tempted to mess with it and smooth things out, but you have to just let it be in order to obtain maximum definition between the layers. Bake according to the package directions.
If it had been up to me, I would have stacked the cakes so that the top cake would be upside down, but since this was Katherine's project, and she didn't want to trim the cakes, she went with the stacking configuration that she felt was most stable.
As for your frosting options, I think you absolutely must go with a neutral color. Half the fun of baking the Rainbow Cake is the surprised reaction of the people who are eating it, so the frosting should give no indicator of the party that lurks within. Just be careful to assemble a crowd of people who are not colorblind to consume this cake, otherwise you'll be depriving yourself of half the fun...


No comments:
Post a Comment